Have you ever been in the review process of a MadCap Flare project with your team and needed input or an additional topic added from colleagues that are not trained in Flare? You may have thought that it’d be much easier if they could just jump into MadCap Central and add or edit a topic to the project themselves. Well now they can.
This February 2023 release of MadCap Central introduces the ability to author content in the cloud directly in Central. That means you can add new topics, edit existing topics, add new snippets, and more all in Central without the use of Flare. Most of the heavy duty authoring will still be done in a local Flare project, but some more common things you do in authoring can now be done in Central.
And it’s not just a value add for those who aren’t trained in Flare. If you as an author are in Central and realize you have to make changes to a Flare project, now you can make those in Central. You can re-synch later in Flare to get it back down to your local copy.
Authoring in Central is available for single-bound projects. If you have a dual bound set up with source control binding to another provider and a second binding to Central, unfortunately the Authoring feature will not work.
There are different things you can do in Authoring including:
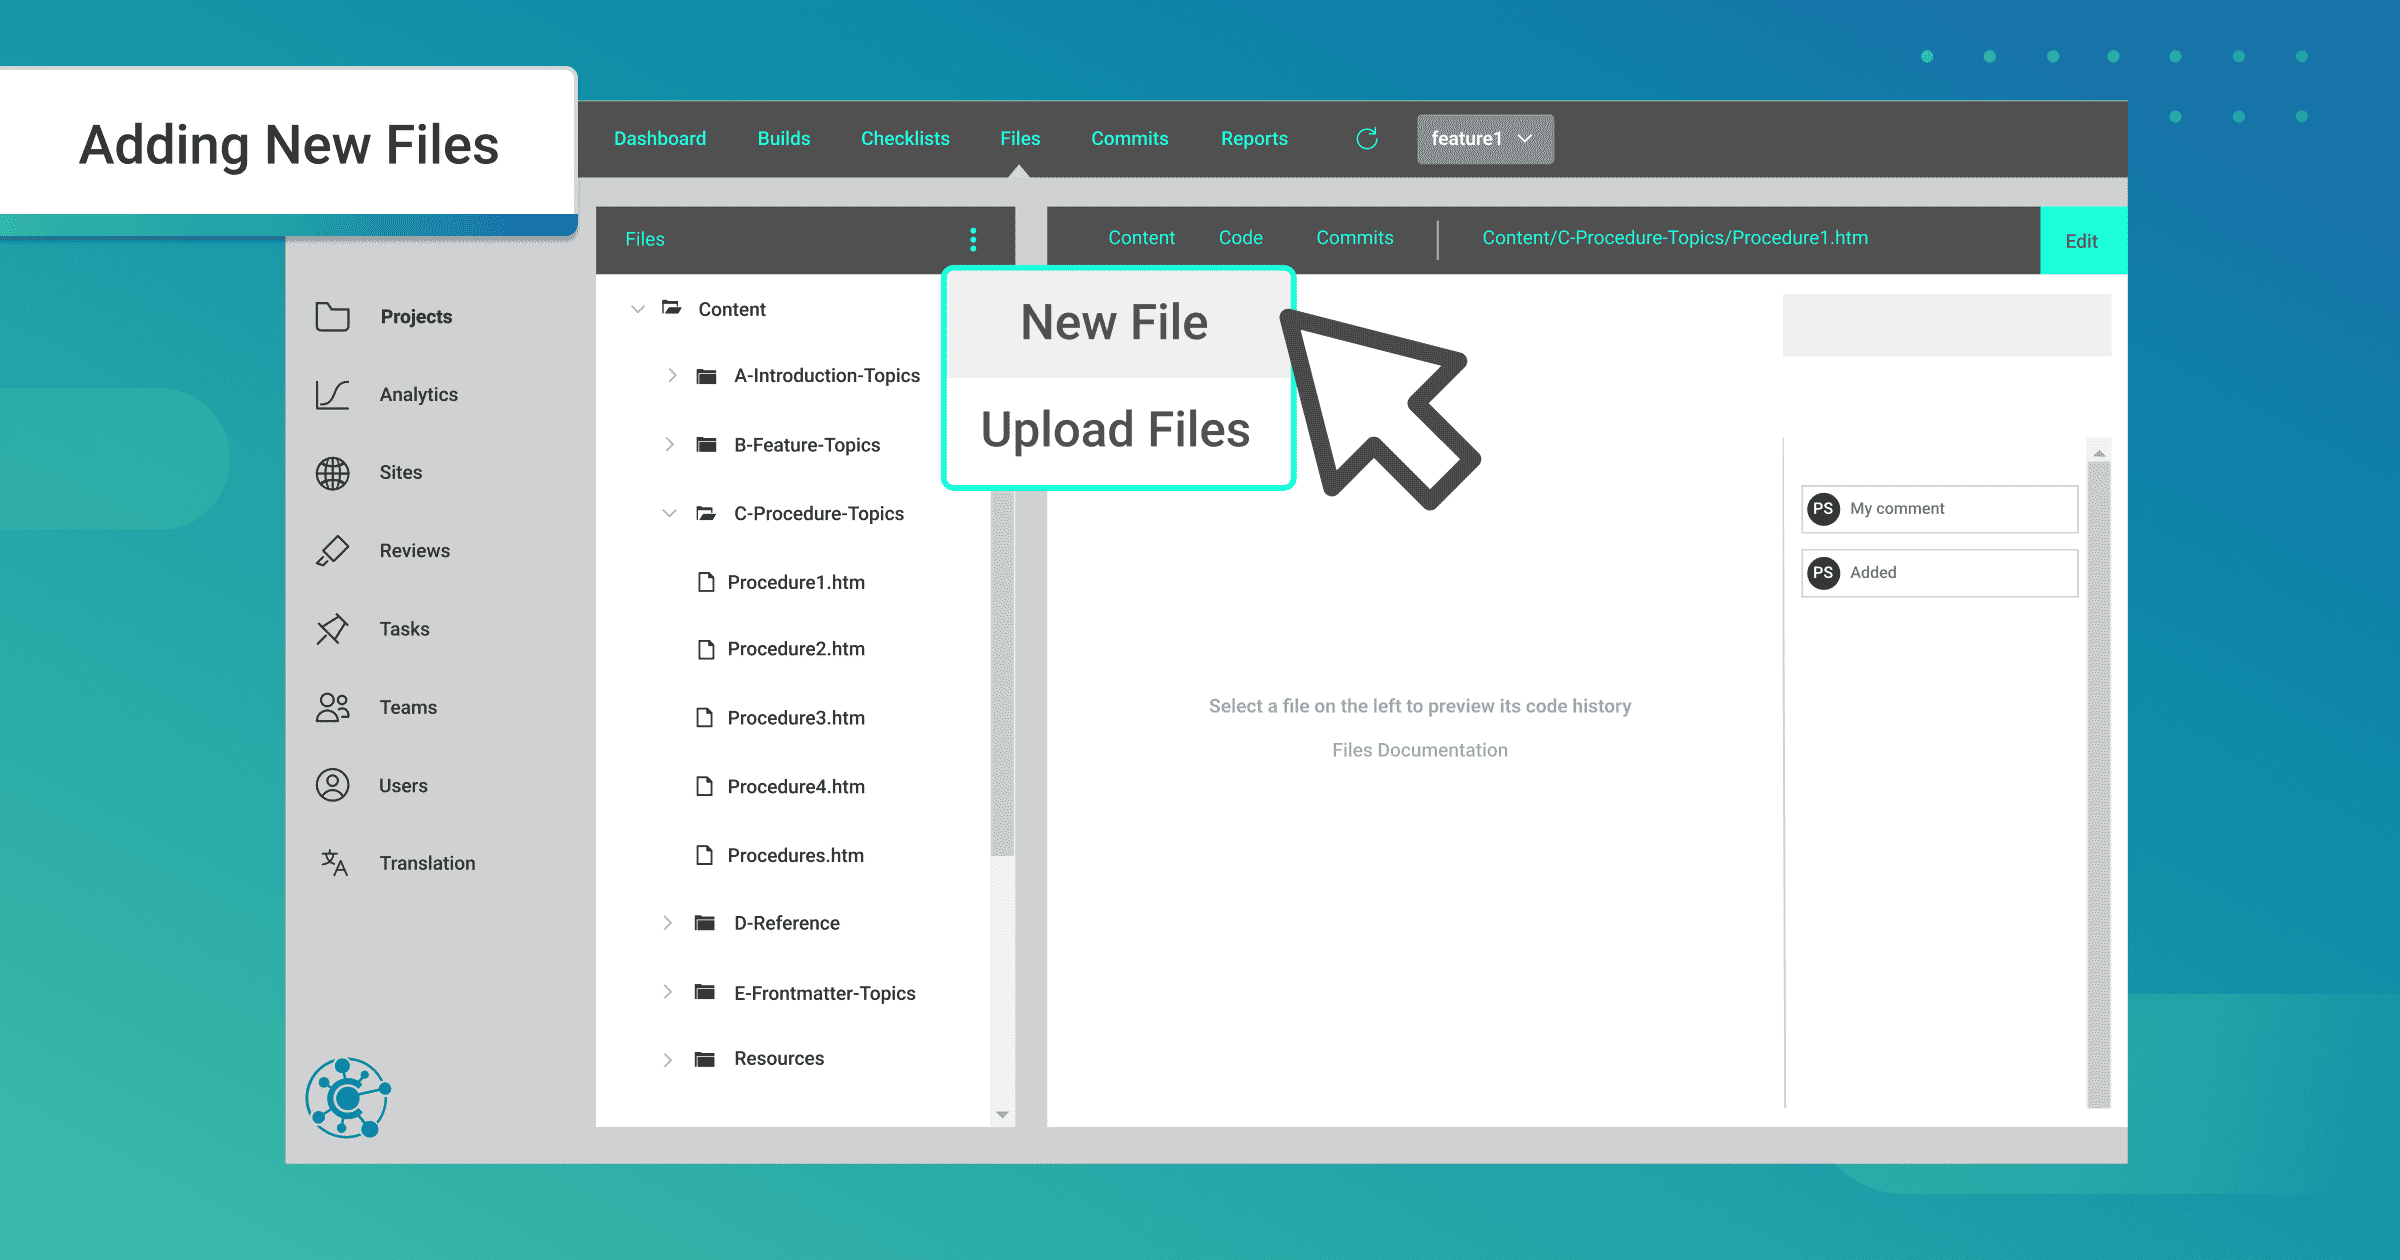
- Adding New Files
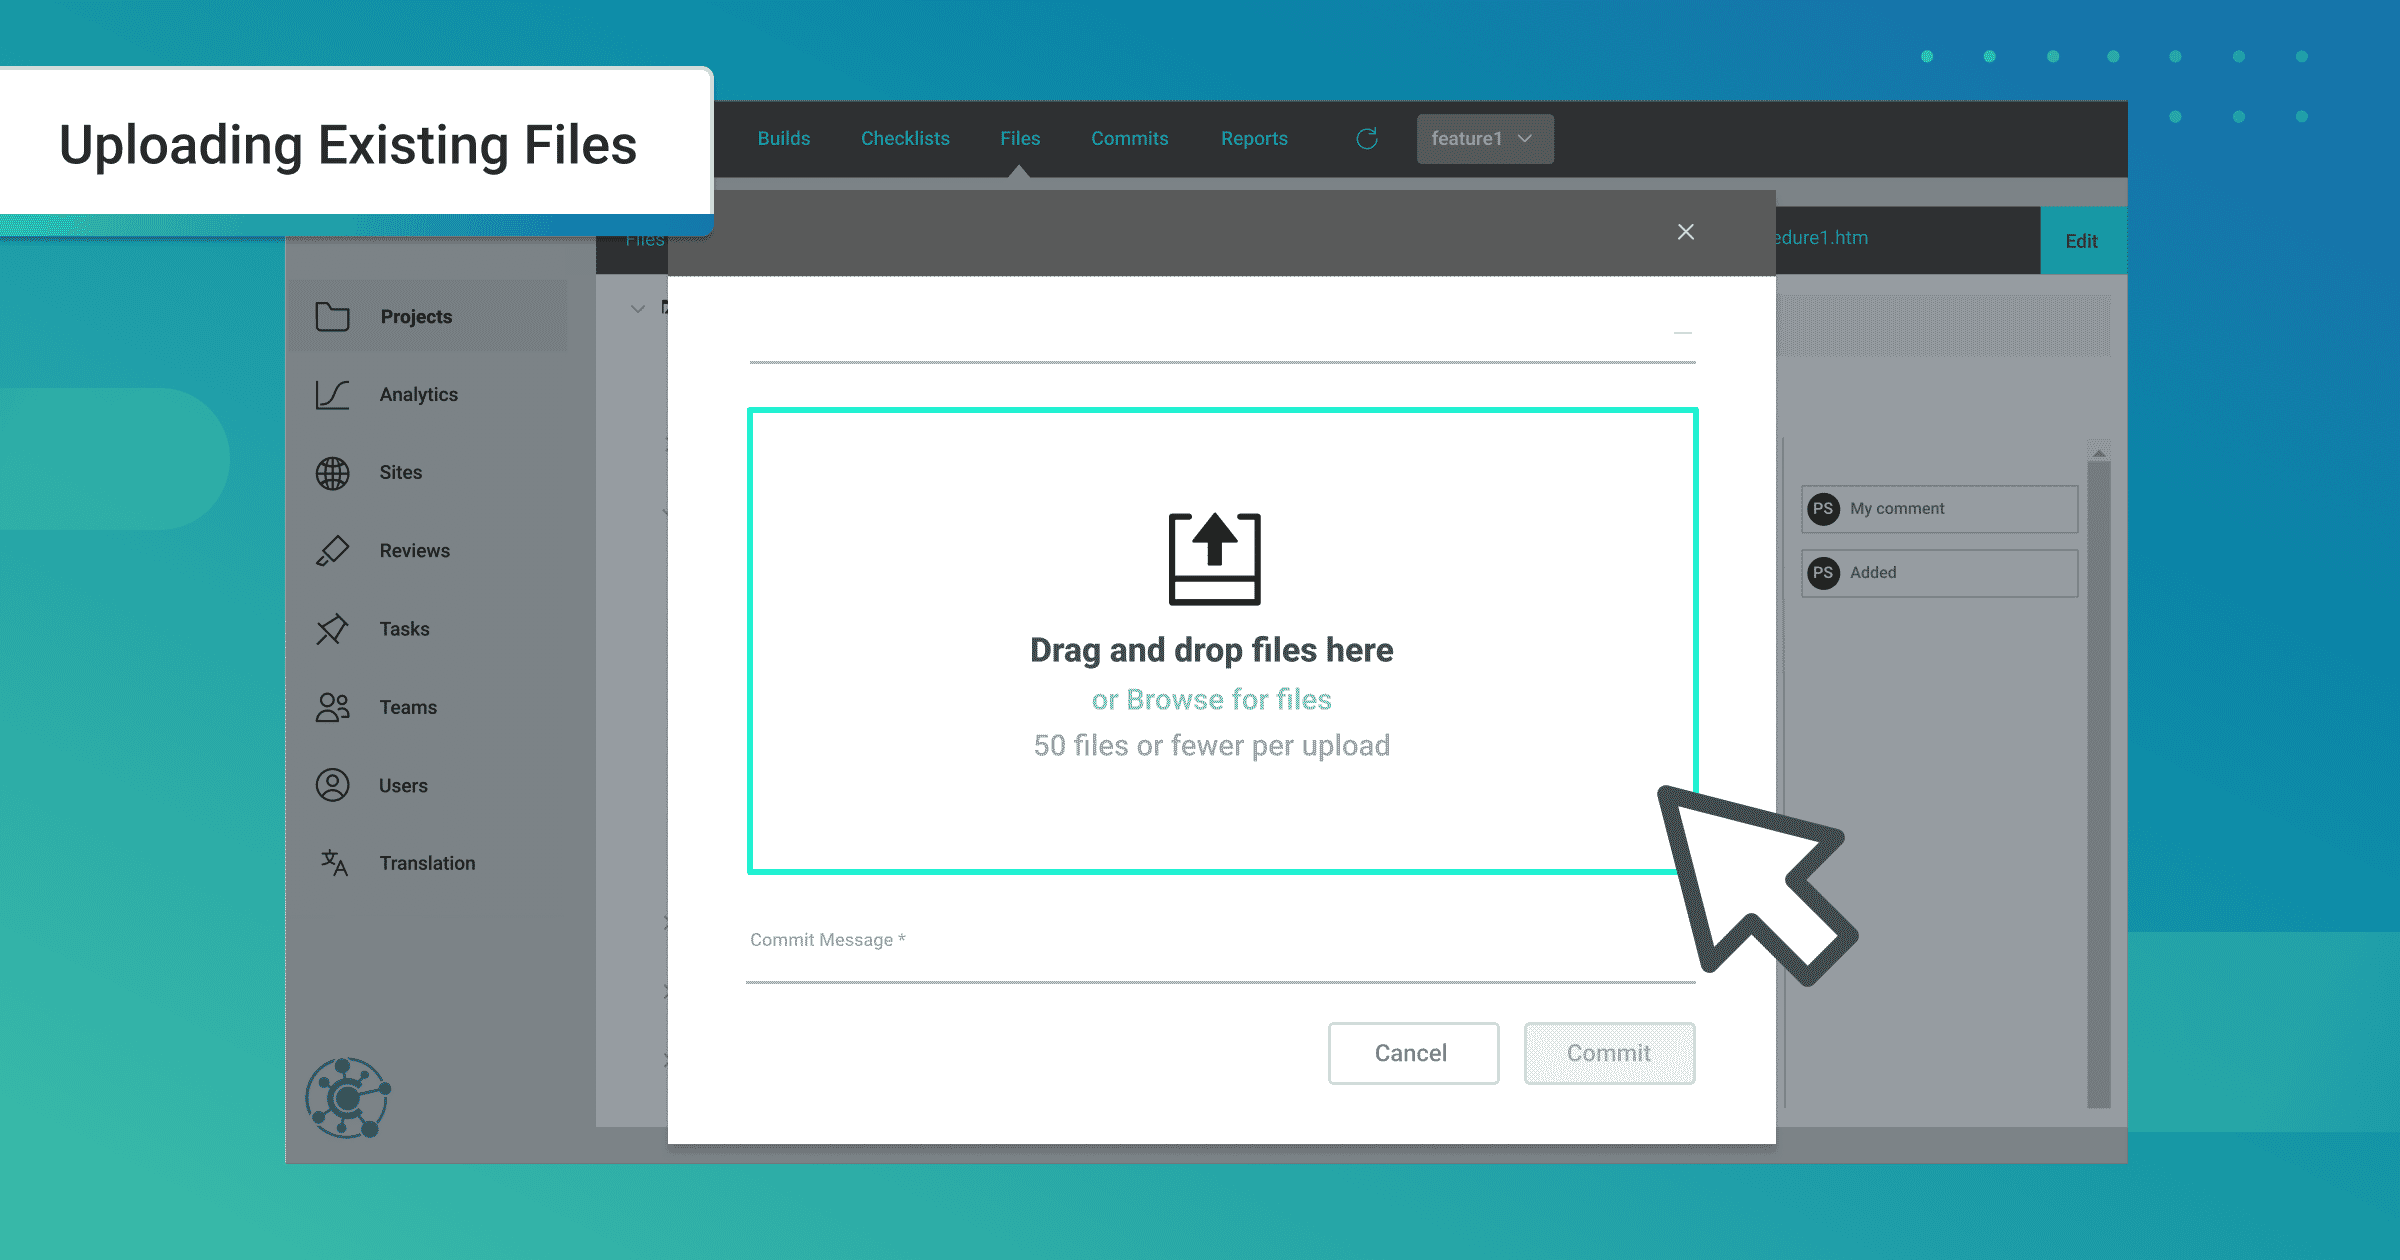
- Uploading Existing Files
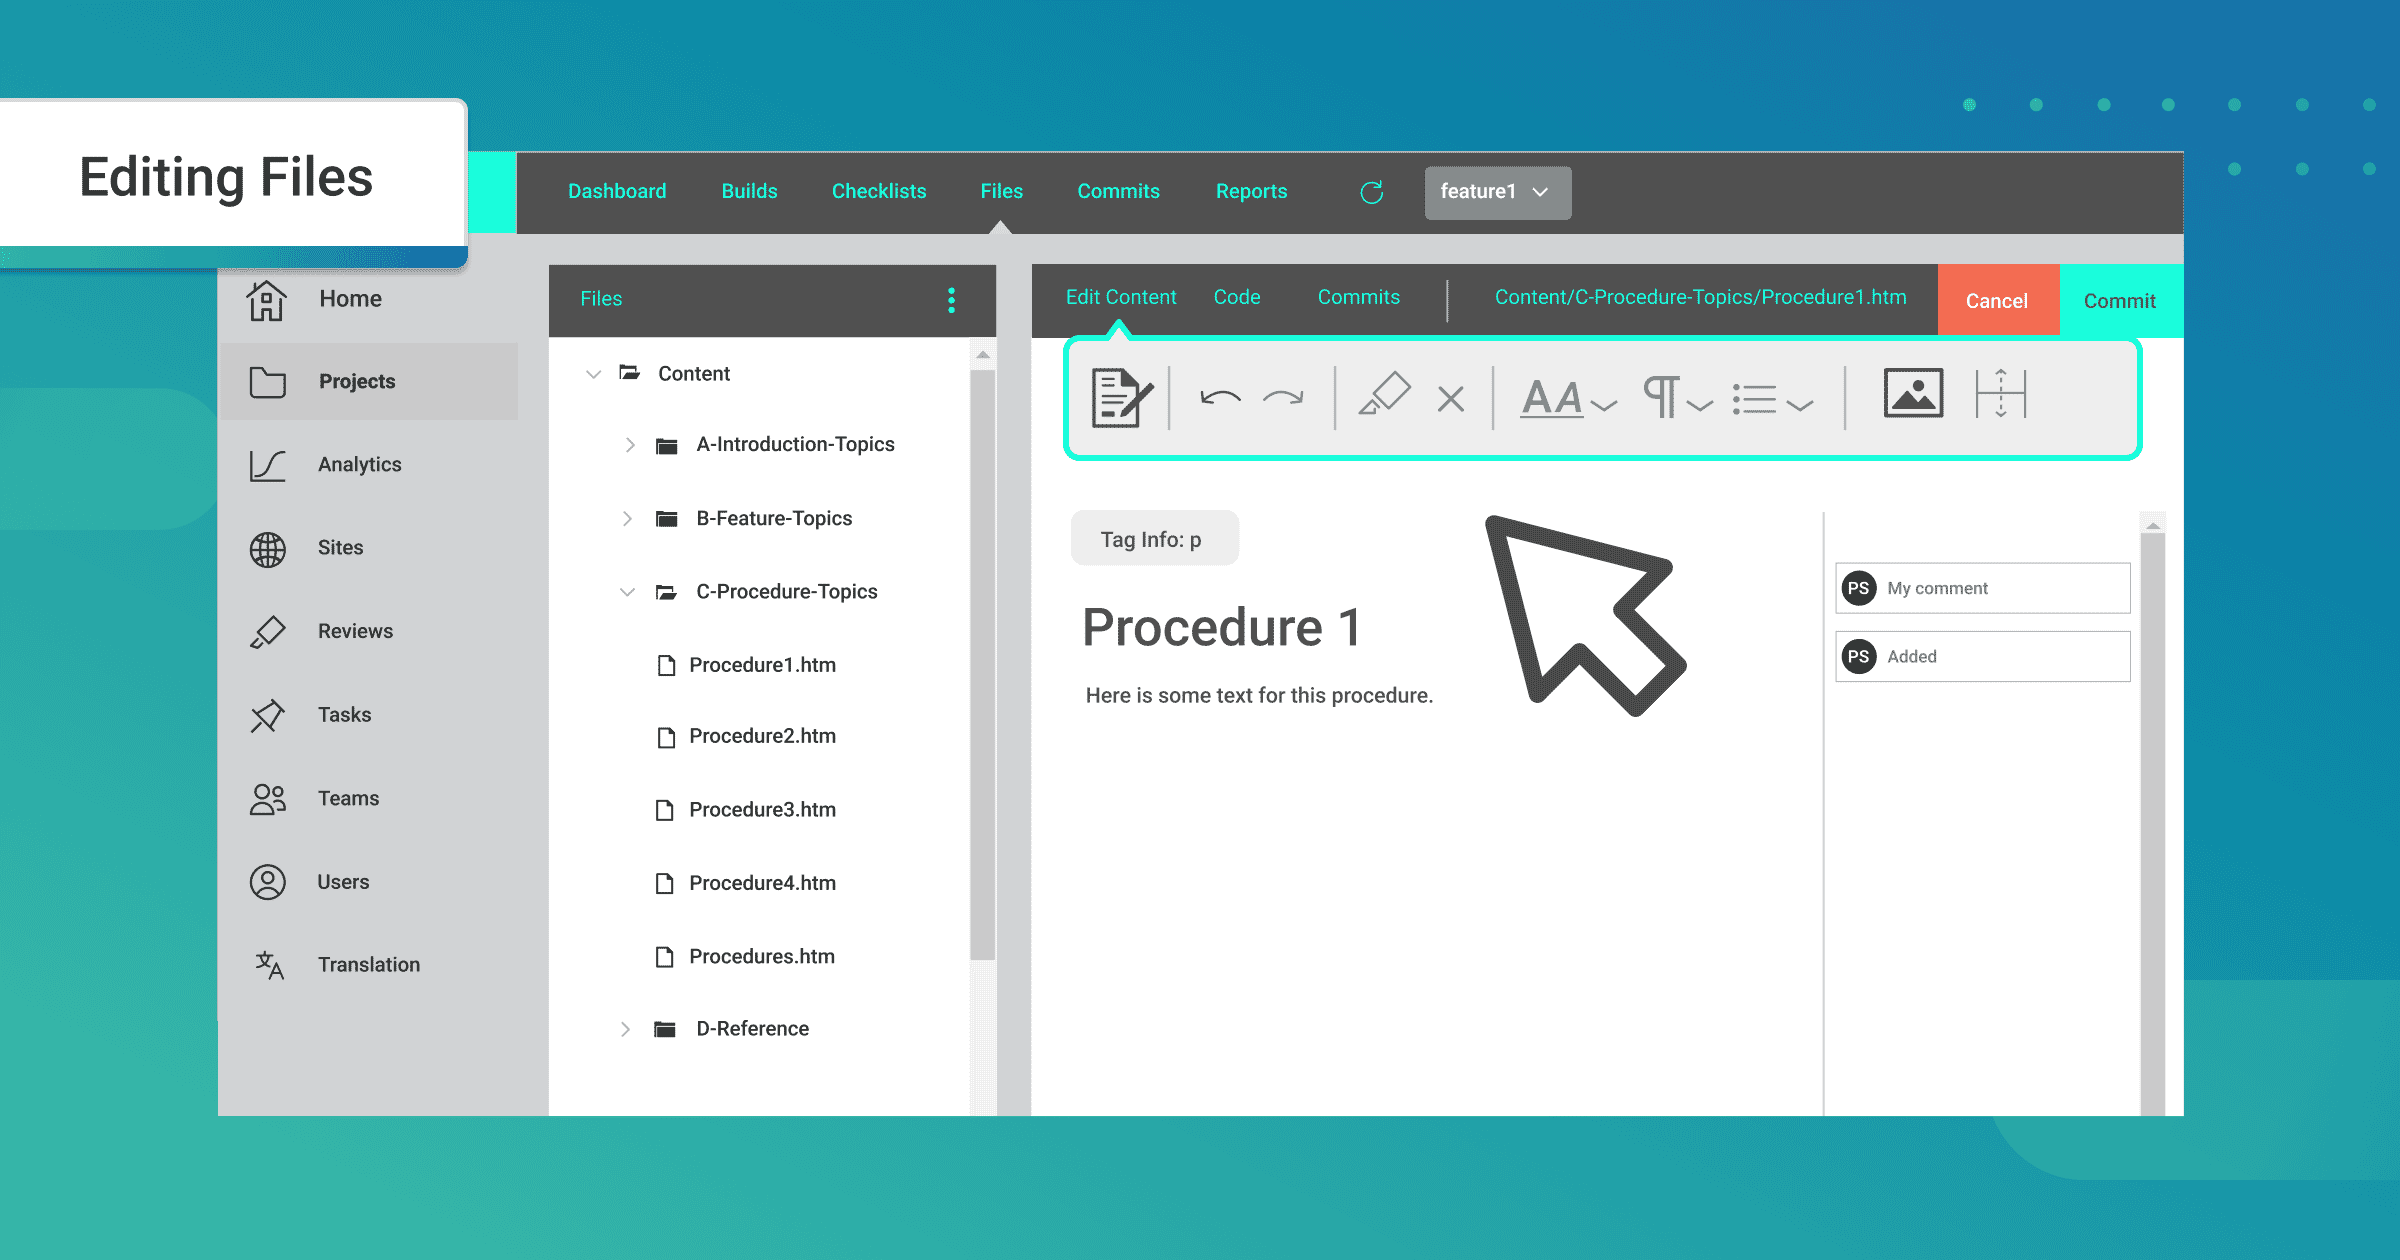
- Editing Files
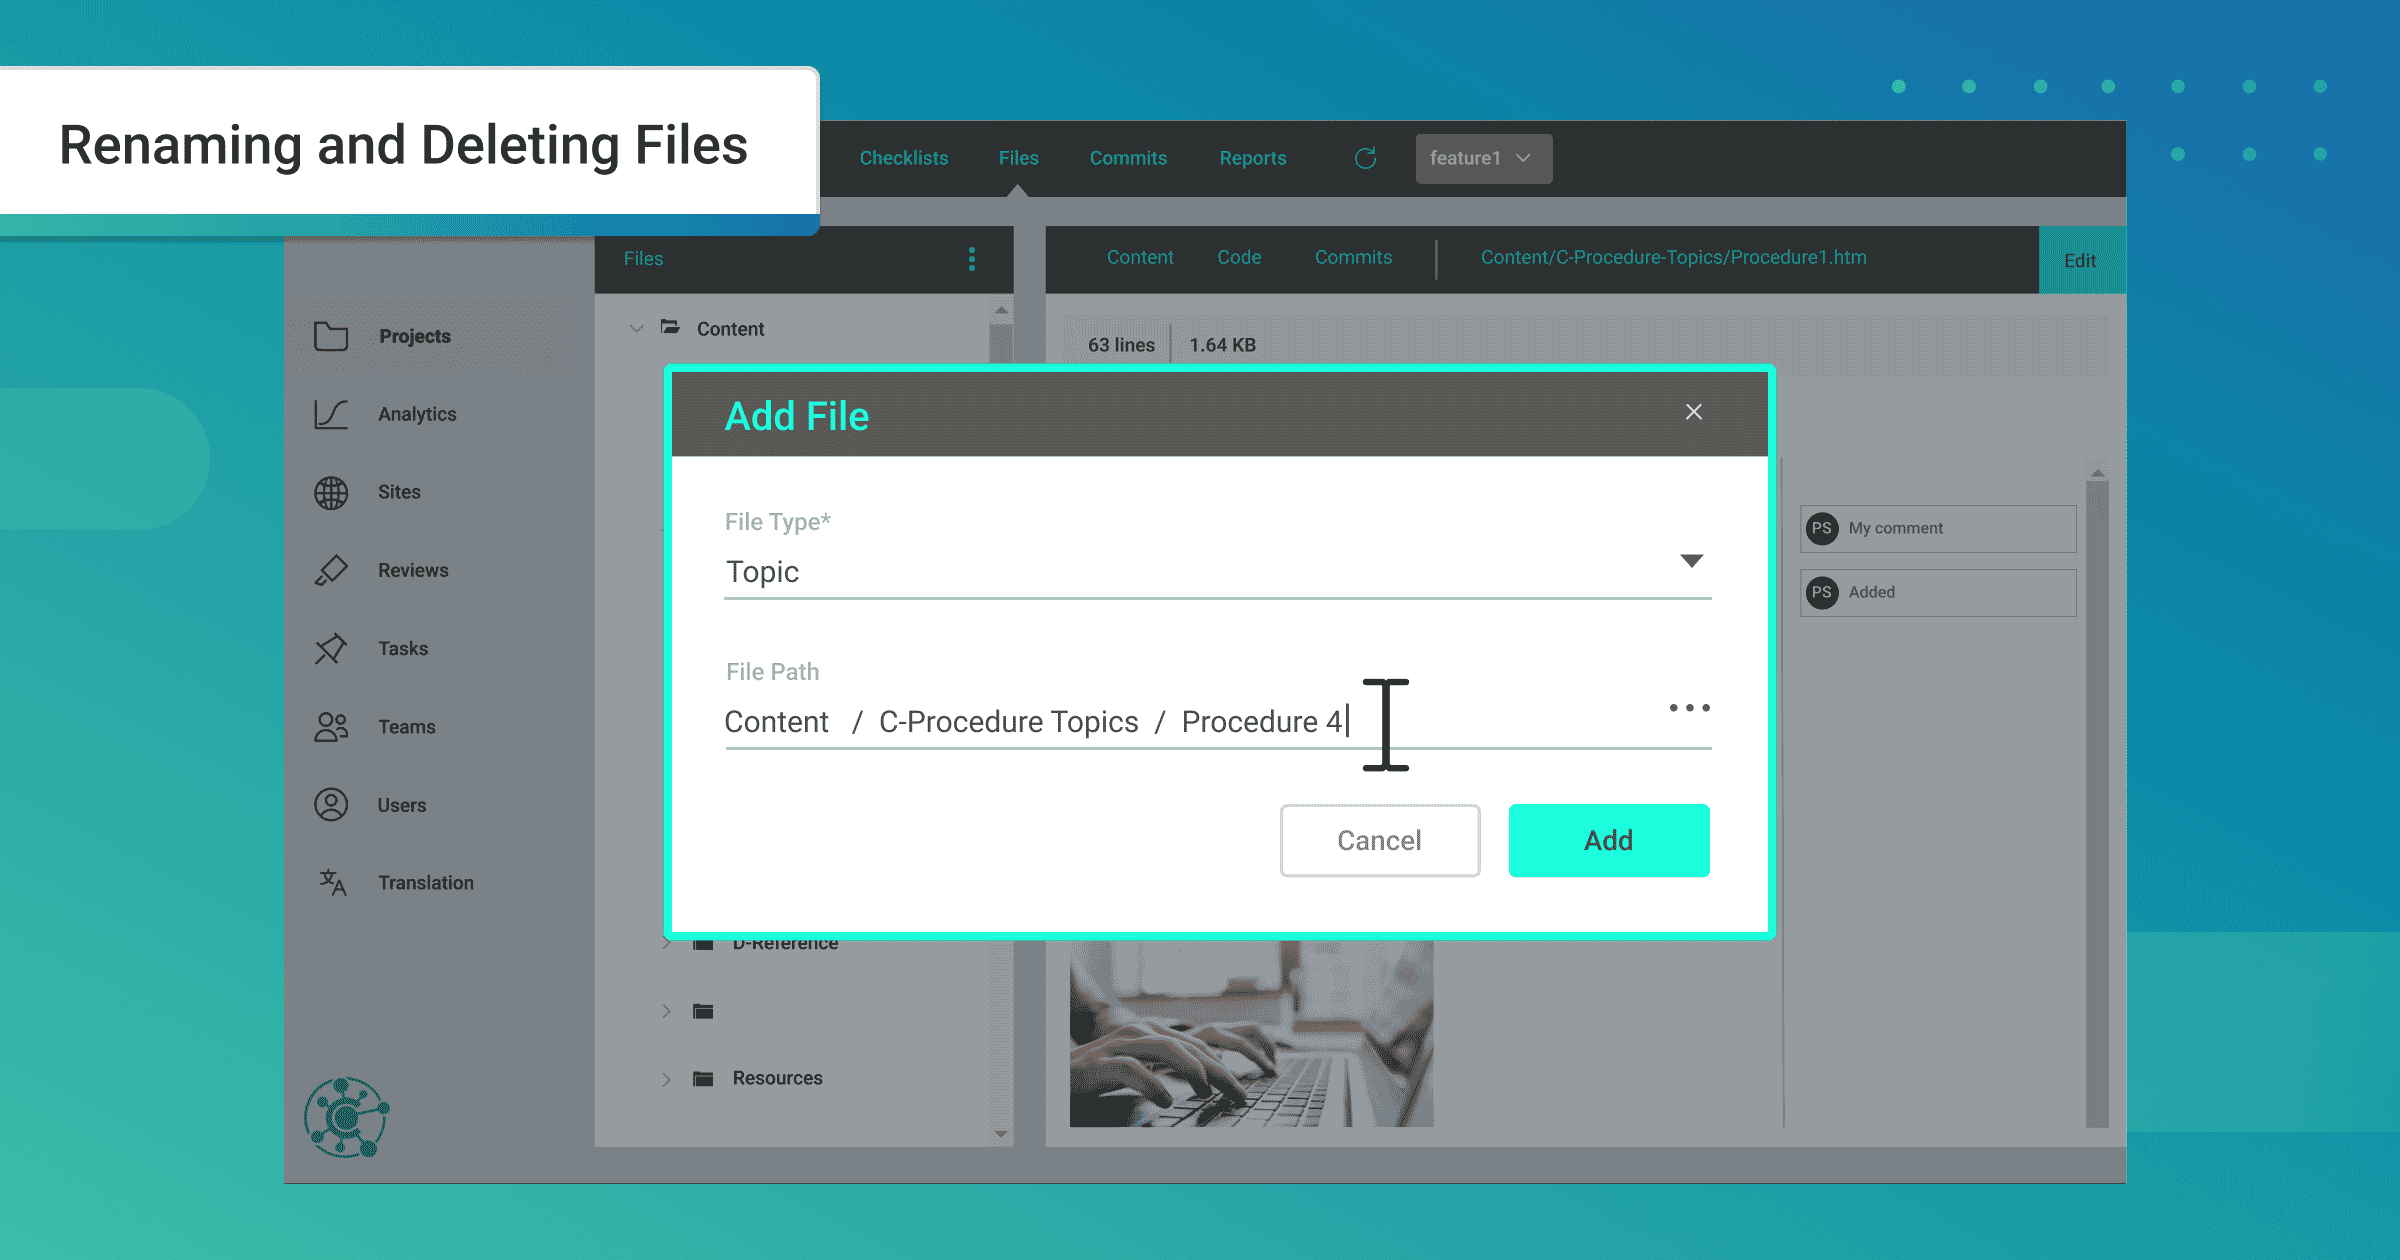
- Renaming and Deleting Files
Author Permissions
MadCap Central administrators can set permissions to identify who can author and manage content – from specific users to entire teams – by granting the ability to create and edit files or edit code. You’ll find these options in Permissions > Files. Administrators will also need to make sure individuals who are given these permissions have access to the project being worked on together.
If an individual is a Subject Matter Expert (SME), their seat type can be changed to an Author and they can be given permissions to edit content in projects that they have access to. Intended only for advanced users, administrators can prevent users from editing the code by deselecting the Edit Code permission.
Adding New Files in MadCap Central
In the updated Files page view, you can now add, upload, and edit project files. To add a new file, open your project and confirm you’re on the right branch if using branches. Click on the kebab menu (vertical 3 dots) next to Files and select New File.
You can create brand new Topics, brand new Snippets, and new Text files (Other). Then decide where it needs to go - the File Path - and add the name of your topic. Make sure you click Commit to add it to your project.
If you need to create new folders for the content you’re creating, after you select the file type and file path type the name of the folder you want to create, then add a backslash and your file name. Click Add and Commit to add the new folder and file to your project.
Upload Existing Files in MadCap Central
You can upload existing files such as PDFs, Word documents, images, etc. to your projects through MadCap Central. To do so you click on the kebab menu (vertical 3 dots) next to Files and select Upload Files. Confirm the Folder Path you want your files to be placed in. Once you select the files you want to upload, write a Commit Message and click Commit to add the files to your project.
Editing Files in MadCap Central
MadCap's content experience platform interface includes an easy-to-use editor with toolbars for authoring functionality. Depending on the file, you can edit in two different modes – the content editor or the code editor.
When looking at the tool bar in the Content editor, individuals have the ability to track changes or stop tracking changes, undo and redo changes, insert and delete annotations, add basic styling tags, images, tables, etc.
Within the Code editor, individuals with permissions can add and change tags, add content, wrap text, and clean up code. You also have the ability to right click on the code file and select “View Raw” to open another tab in your browser with a stand alone, clean version of your code in HTML. Make sure to Commit when you are done making any changes while editing files.
Renaming and Deleting Files
Another thing you can do with Authoring is renaming files. But use caution when using this feature. If you happen to have a file that has links from other files, once you get it back into Flare, you may end up with broken links.
To rename a new file you’re editing while Authoring, you can simply click Rename when right clicking on the file. Since it’s a new topic, you more than likely don’t have it linked anywhere so you won’t have an issue with broken links.
If you are renaming an existing file, right click the file and select Rename. In the File Path, change the name, commit and make a comment for the change and select Rename. But note that the file path has been edited and you may find broken links if anything is linked to this file within your project.
What’s Next? Synchronizing the Files
When you or other contributors are done adding or editing files in your project, make sure to go back to MadCap Flare and pull the changes into the Flare project. If you used a specific branch, select that specific branch before you pull the new changes/updates.
If you want to check and see if you broke anything, go to your Analysis ribbon and click Summary. Flare will scan the project to analyze if any issues have popped up. If you see anything in red, you know there is something to fix.

Latest Webinar: Join Us on February 16th at 10am PT
We invite you to join us on February 16th at 10am PT for our latest webinar, Introducing Cloud-based Authoring in MadCap Central.
MadCap Software's Mike Hamilton, VP of Product Evangelism, will share how you can improve your authoring efficiency by allowing anyone in your organization without MadCap Flare expertise to easily create content in the cloud.
For more information on this latest release of MadCap Central, refer to this topic in the online Help, and visit the What’s New page. You can request a 30-day trial here.


