Expanding possibilities with MadCap Flare 12
Homer Christensen dives into the new version of MadCap Software’s Flare.
When asked why use MadCap Software’s Flare as my documentation tool of choice, my response typically includes some variation of this: It works. It does what it says it will do.
Being honest about software capabilities and working at long stretches without a glitch are both rare enough qualities and satisfactory in most cases. Lately, however, I’ve appended my response to flesh out what excites me about using this tool: it enables you to innovate and explore possibilities to make your documentation or help system a truly positive user experience.
Flare was always a solid platform for producing context-sensitive or standalone online help and print or electronic documentation. The release of Flare version 11 a little over a year ago expanded that platform to enable authors to design responsive world-class websites that need bear little resemblance to the traditional three-pane help site of yore.
If you’re using version 10 or earlier of Flare, then upgrading is strongly recommended. Your current version may have all that you need, but the new versions enable you to do so much more.
If you use version 11, read on. I’ve listed some of the features that help my workflow and save me time and effort. I’ll show you how I use it currently or plan to in future projects.

Set variable values pretty much everywhere
Flare always had variables, but they were applied at a target (output) level.
Variables are often used for headers and footers, version numbers, and other text that changes based on the target.
You can now set snippet variable values a variety of ways, so that if a snippet is used multiple times in the same topic, you can control the value each time the snippet appears.
At the most specific level, you can set the variable value directly within the snippet properties. The same snippet used three times in a topic could have three different values. Or, you can set a variable value within the topic properties. Any snippet without a snippet-level value would use the one set in the topic. If you set neither a snippet or topic value, Flare inserts the default value stored in the target or project.
For instance, if you are documenting five products and want to ensure that the install links are handled the same each time, you can create a single installation snippet that uses variables for the product, version, and installation link. You can now insert that snippet wherever you want to include the installation link and set the values without modifying the snippet. In the past, you would have had to insert the snippet, convert it to text, and enter the values directly into the text.
To set snippet variables, you right-click the snippet block and click Snippet Variables... (Figure 1).
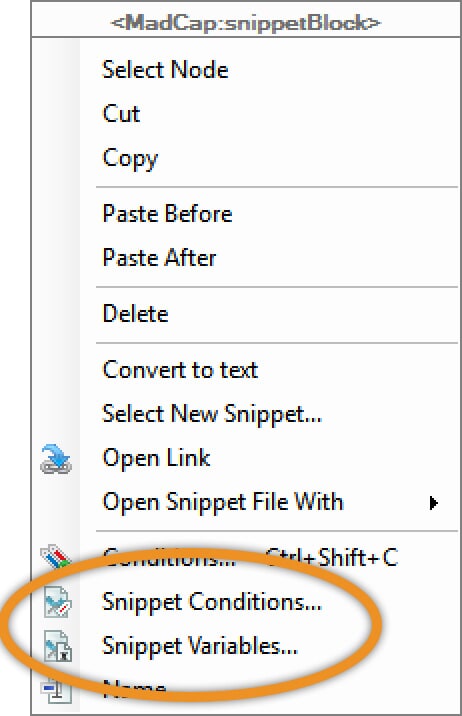
Figure 1. New commands for setting variables and conditions on snippets
What’s more, you can use variables in several dialog boxes. For example, in the scenario above where we defined installation links, you can set up the hyperlink to use variables, too (Figure 2).
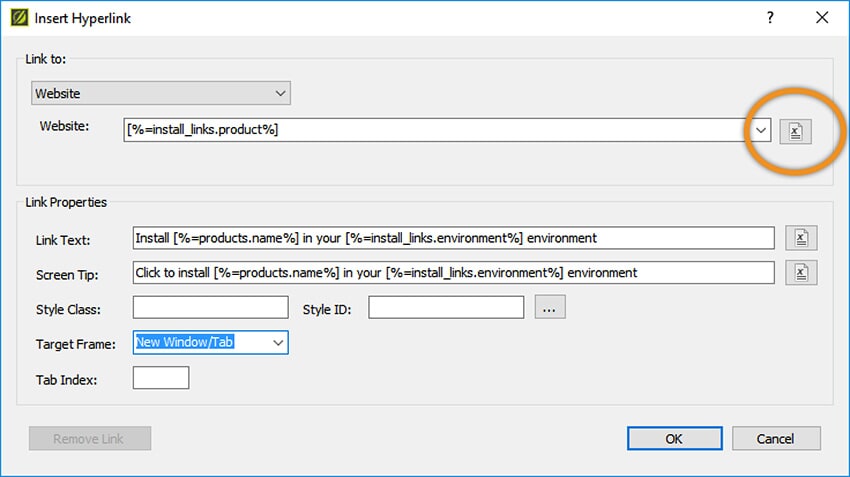
Figure 2. The Insert Hyperlink dialog box showing multiple variables
In your single-sourced reusable world, you can now place that snippet on each product page and several on an installation links page. Should you realise that the snippet would be better with punctuation marks, you can simply change the original snippet and all instances change.
Set condition tags on snippets
Like variable values, condition tag values were set on the target and could be used on topics and block texts to include or exclude that topic or text in the target.
MadCap Flare 12 provides the option to set condition tags for each snippet used in a topic, so that the final output could vary for your output based on whether you set a flag on the condition to include or exclude it from the topic.
Grouping and pinning snippets
Another change made to snippets includes the ability to view the most recently used snippets and pin frequently used snippets so that they appear at the top of the list. For those of us who use a significant number of snippets in our projects, grouping and pinning are very welcome. While I have many shared snippets, I tend to use some more frequently than others. Pinning them saves some time and mouse-work.
The Insert Snippet Link dialog box (Figure 3) has been redesigned accordingly. The dialog shows a group of up to 20 of the most recently used snippets. You can pin only those snippets that appear in the recently used group, so it is a two-step process to pin a snippet. In practice, I can now pin inserted snippets as I insert another.
Previously, Flare presented the list of snippets in a directory format, so this organisation is a significant productivity enhancement.
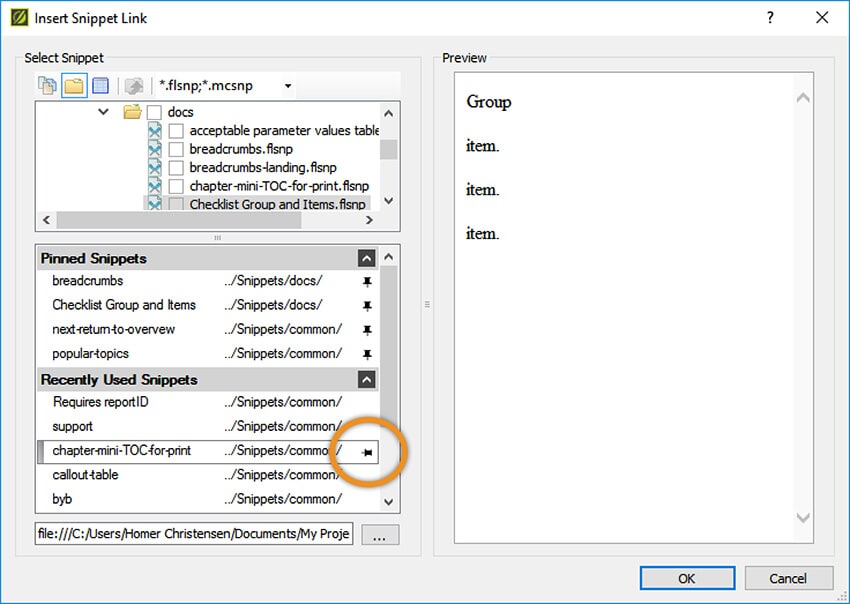
Figure 3. Insert Snippet Link dialog box showing pinned and recently used snippets.
The CSS Stylesheet Editor has been completely revamped
I had long ago abandoned Flare’s built-in Stylesheet Editor. Its limitations and functionality resulted in me hand-coding the CSS styles. I could do so more quickly and with better organisation. I like to comment my stylesheet and organise styles based on functionality. Flare’s previous Stylesheet Editor reorganised my sheet and often moved comments away from where I placed them.
Flare 12 redesigned the Stylesheet Editor in a couple of innovative ways:
- It is easier to select colours in the stylesheet. Wherever an element includes the colour property, the Stylesheet Editor includes multiple ways to select it. You can type in the hex value, use a colour picker, choose from saved or named values, or use an eyedropper tool to select an on-screen colour (Figure 4).
- You can now enter size unit values directly into the property box. Previously, you had to enter the number of units and then select the unit type. Now, if you want to set a value of 1.1 REMs, you can simply type 1.1rem. (Yes, Flare now supports rem units.)
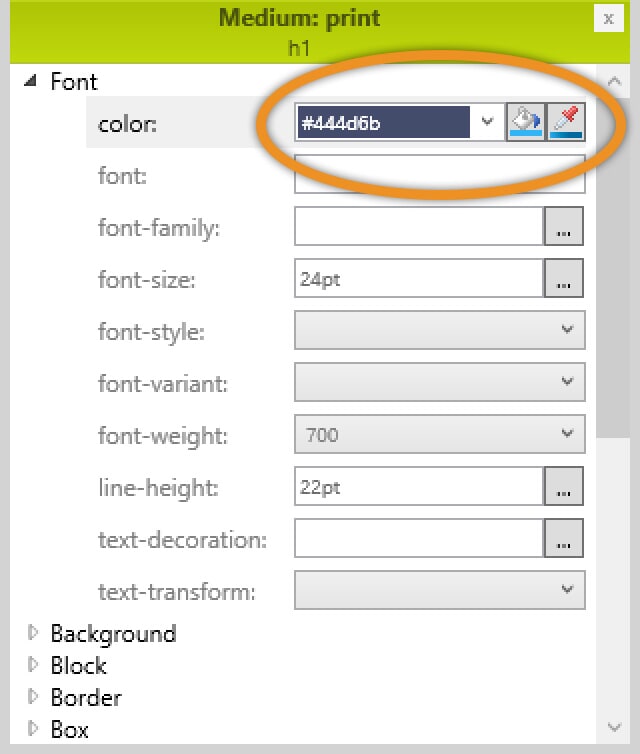
Figure 4. The Stylesheet Editor provides multiple ways to enter colour values.
These changes alone make the Stylesheet Editor much more usable, especially for users who are learning or who need only make a small change to a stylesheet.
Flare 12 also includes a helpful feature to provide in-context help within the Stylesheet Editor (Figure 5). Whenever you select a style, Flare displays any comments you added to the style definition and describes the purpose of the selected element.
The new Stylesheet Editor is visual and well-organised. The description of the selected element is also very handy, especially for MadCap-specific or infrequently used styles.
The most significant change to the Stylesheet Editor is the ability to simultaneously view stylesheet values of multiple mediums or media in a synchronised window (see the accompanying sidebar on the following page).
I’m likely too set in my hand-coding ways to switch back to using the Stylesheet Editor as my primary CSS authoring method, but I see high value in using this editor as a production check of the design across my project’s mediums. I can now quickly scan to see that for each medium I have set the correct colour and used the appropriate size unit.
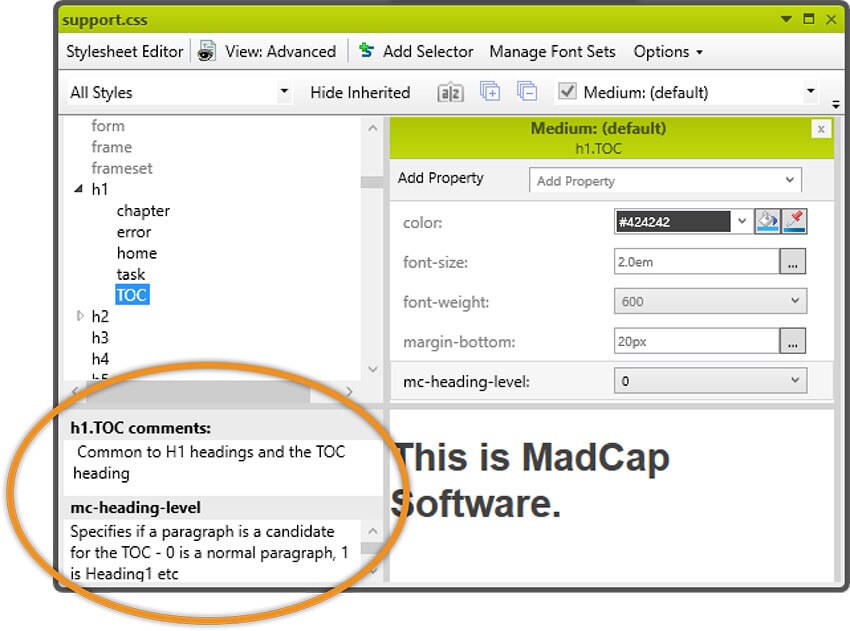
Figure 5. In-context help displays on the Stylesheet Editor whenever you select an element to edit.
Conditions on styles
One new feature that might have quite a bit of usefulness is the ability to set conditions on styles using the new mc-conditions property. By setting conditions on styles rather than directly on the content, for example, you could produce a review document that contains all version information but visually shows which bit of content goes in each version.
For a site intended for an internal audience, for example, topics can include internal- specific text where it might add value to support representatives, but is excluded on the public website.
Comparing Multiple CSS Mediums in the Stylesheet Editor
In Flare 12, the redesigned Stylesheet Editor provides a great way to view the settings of styles across mediums.
Double-click a stylesheet to open it in the Stylesheet Editor. At the top of the window is a dropdown with a checkbox. Click to expand the dropbox and select the mediums you want to view (Figure 6).
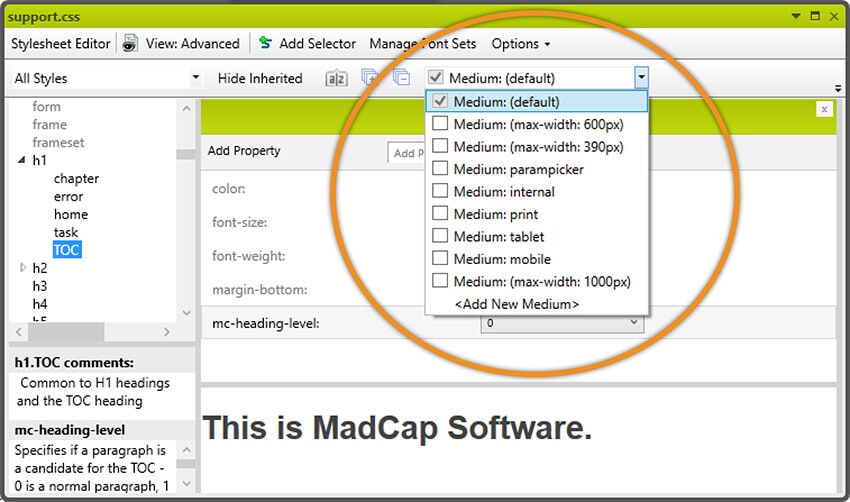
Figure 6. Select the mediums you want to view.
Flare presents the selected mediums in a column view (Figure 7). Each column is synchronised, so that selecting a value in one displays the current value for each of the mediums.
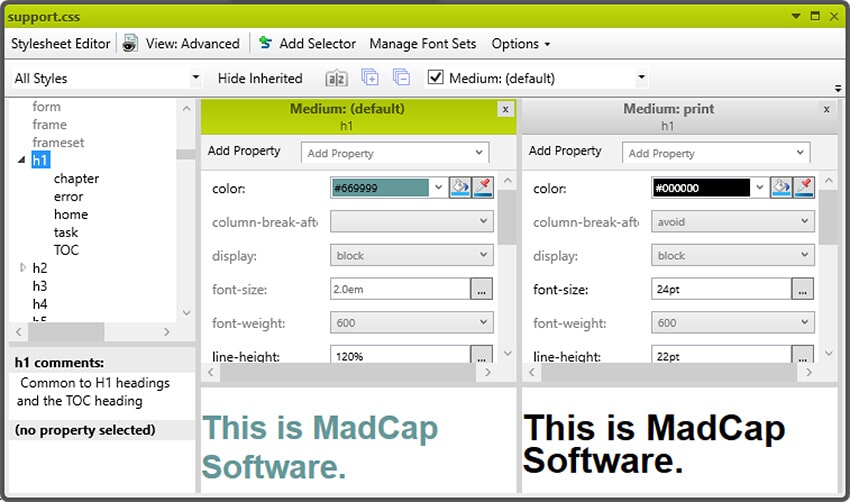
Figure 7. Synchronised view of two mediums from the selected stylesheet.
Viewing the medium settings in this format is a great way to check design settings before building the outputs.
You can edit the values of each column and the display of the sample text changes as soon as your cursor exits the value entry box.
Local and master stylesheet support
You can now specify the stylesheet you want to use on a topic level. Styles on that sheet override those specified as the default on the target or project level.
Responsive layout
Flare 11 introduced the Foundation framework and responsive layouts in HTML5 targets, but positioning elements in a responsive grid was still quite challenging, involving float or inline-block div elements with percentage values and media queries to adjust the values based on the screen’s viewport.
Flare 12 has a new Responsive Layout pane that helps you build a grid layout for each of your targeted media sizes. (For additional information, see Matthew Ellison’s column, Responsive Layout in Flare 12, on page 56 of the ISTC Communicator Summer 2016 issue.)
Word and PDF reviews now display tracked changes in outputs
If you work with reviewers who want to read and comment using Microsoft® Word or PDF files, Flare 12 now includes the ability to build targets that display the changes made during the review cycle.
While you must use MadCap Software’s Contributor to truly round-trip changes and annotations between Flare topic authors and reviewers, you can now export a Flare topic that contains tracked changes to a Microsoft® Word or PDF file that displays those changes and annotations.
This functionality would have been welcome on a previous project where the review cycle required us to export to Word and, after receiving the comments, type the changes into the Flare project files. Although our workflow would not have changed substantially, we could have exported a final draft with the changes displayed so that the client could easily verify that their requested changes were in the document.
To use this feature in your project, you’ll need to select a checkbox on the Advanced tab of the target (Figure 8).
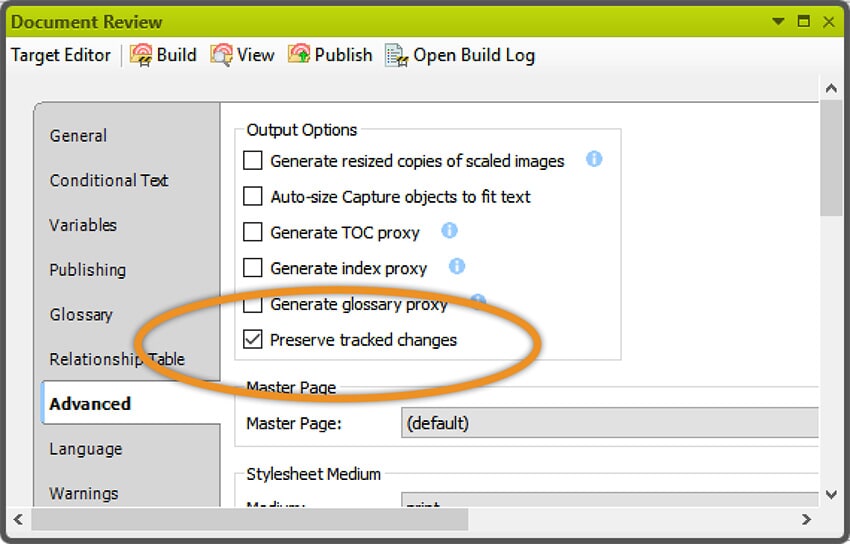
Figure 8. Display tracked changes in Word files.
Any changes you make in the Flare files while tracking changes will reflect in the output (Figure 9). Flare includes annotations as well as edits. It does not track CSS style changes (such as adding a span to set type in italics).
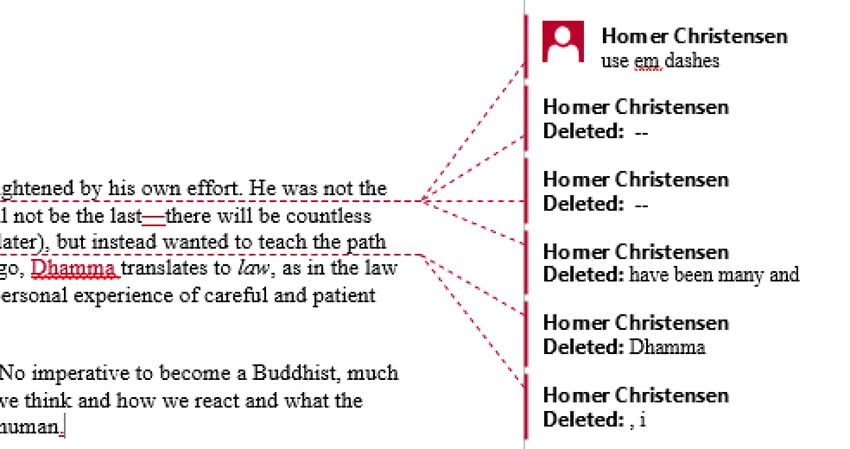
Figure 9. Tracked changes in the Word output.
Flare also includes an option to automatically turn on tracked changes in the exported Word file, so that reviewer comments are tracked by default.
Tracked changes in PDF file exports work in a similar manner.
Cross-reference almost any element in a topic
New cross-reference features are available within Flare 12. It used to be that you could link only to a topic title or an existing bookmark.
When you create a cross-reference link in Flare 12, you can now select:
- Bookmarks
- Headings
- Paragraphs
- Unordered List items
- Table of Content items
- Dropdowns and Expanding Text
- Styles.
Unfortunately, you cannot link to individual steps in an ordered list. (You can create a bookmark on a step, but it will contain the text, not the step number.)
Essentially, Flare is creating a bookmark on the fly in the destination topic. In fact, you set this type of cross-reference link by selecting the destination topic and then clicking the bookmark icon to access the elements you can select.
Translation management and outputs
Flare 12 introduced several important features that will facilitate producing output in multiple languages. Full disclosure: I have not yet worked on a project that included translation, so I reached out to others who do a good bit of translation. No one I spoke with had yet completed a translation project through Flare 12, so this section is based more on theory and probable use than on experience.
Flare uses skins to define placeholder text, form field labels (if you use Pulse, a companion product from MadCap Software), and the look and feel of the interface elements built by Flare during compile.
These skins used to be stored outside the project.
Language skins are now stored within the Flare project, so you can more easily manage and translate the text on the user interface. That includes the placeholder text that appears in the Search bar as well as form field labels and default values (language skins are placed in the Advanced folder within the Project organiser).
A more significant change, however, is that Flare 12 now supports a multilingual project build process from within a single project. This enables you to build a HTML5 or PDF output that includes translations directly within the output. When a viewer opens an HTML5 site, the viewer’s default language is chosen (if available within the project). In addition, Flare can include a drop-down that lists all available languages in the project, so that users can quickly switch among language versions.
PDF files are handled a bit differently. Flare outputs the default project language first, and then builds and appends the PDF file with the output from each of the languages within the project. That might be helpful for smaller product assembly instructions, but may not be what you want for larger documentation sets.
Flare 12 also automatically converts straight quotes to language-specific smart quotes now, but only during authoring. To replace existing straight quotes, you would need to run a find and replace on all files in the project.
Quick list of other interesting changes
The new 64-bit Flare 12 also includes feature enhancements to glossary and index entries, equations, drop-down and expanding text sets, as well as several other areas.
To learn more about the new features, visit www.madcapsoftware.com/products/flare/

About the Author
Homer Christensen
Homer Christensen is a Certified Flare Developer and Instructional Designer. He consults with companies large and small to architect and design new content sites and evaluate, re-structure, and refine existing content systems. He’s especially enamored of how snariables are both simple and powerful. His clients include Rivian, Nestlè, and Microsoft. Find out more about him on www.homerchristensen.com.


